

A great dessert starts long before the filling is added—it begins with the perfect crust. A homemade Graham Cracker Crust delivers the ideal combination of buttery richness, delicate sweetness, and satisfying crunch that store-bought versions simply cannot match. Whether you’re preparing a creamy cheesecake, a refreshing no-bake pie, or a classic family dessert, a well-made crust creates the foundation for exceptional results.
The best part is that it requires only a few simple ingredients and minimal preparation time. In this guide, you’ll discover expert tips, easy methods, and proven techniques for creating a flawless graham cracker crust every time.
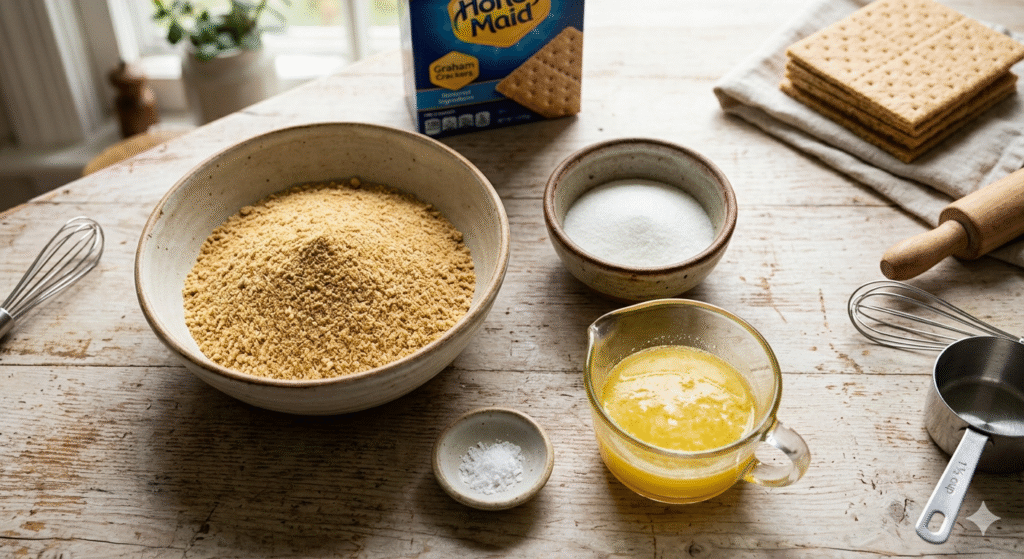
Best Graham Cracker Crust Recipe
Ingredients
Method
- Step 1: Crush the Crackers
- Place your graham crackers into a food processor and pulse until they form fine, uniform crumbs resembling damp sand. (Alternatively, place them in a large zip-top bag and crush thoroughly with a rolling pin).
- Step 2: Mix Dry Ingredients
- In a medium-sized mixing bowl, whisk together the fine graham cracker crumbs, sugar, and a tiny pinch of salt until completely combined.
- Step 3: Add Melted Butter
- Pour the melted butter directly over the crumb mixture. Using a fork, toss the ingredients together until every single crumb is thoroughly moistened. The mixture should hold its shape when you squeeze a handful of it together in your palm.
- Step 4: Press into the Pan
- Dump the damp crumbs into your 9-inch pan. Use the flat bottom of a measuring cup or a straight-sided drinking glass to press the crumbs firmly into the bottom and up the sides of the pan, working from the center outward to ensure even thickness.
- Step 5: Set the Crust (Choose Your Method)
- For Baked Desserts (Blind Bake): Preheat your oven to 350°F (175°C) and bake the crust for 8 to 10 minutes until lightly golden and fragrant. Let it cool completely before adding your filling.
- For No-Bake Desserts: Place the pressed crust directly into the refrigerator for 30 minutes or the freezer for 15 minutes to firm up before adding cool fillings.

Graham Cracker Crust Recipe for Cheesecake: Secrets to a Firm, No-Soggy Base
Ingredients
- 1½ cups graham cracker crumbs
- ¼ cup granulated sugar
- 6 tablespoons unsalted butter, melted
- 1 teaspoon vanilla extract (optional)
- Pinch of salt
Step 1: Prepare the Crumbs
Place graham crackers in a food processor and blend until they become fine, even crumbs. If you don’t have a processor, seal the crackers in a zip-top bag and crush them with a rolling pin until no large pieces remain.
Step 2: Mix the Dry Ingredients
In a medium bowl, combine the graham cracker crumbs, sugar, and salt. Stir thoroughly to distribute the ingredients evenly throughout the mixture.
Step 3: Add the Butter
Pour the melted butter over the crumb mixture. Add vanilla extract if using. Mix with a fork until every crumb is coated and the mixture resembles wet sand. When squeezed in your hand, it should hold together easily.
Step 4: Press Into the Pan
Transfer the mixture into a 9-inch springform pan. Use the bottom of a measuring cup or glass to firmly press the crumbs across the bottom and slightly up the sides. Compacting the crumbs tightly helps prevent cracking and crumbling later.
Step 5: Pre-Bake the Crust
Preheat your oven to 350°F (175°C). Bake the crust for 8–10 minutes until lightly golden and fragrant. This important step creates a protective barrier that helps keep moisture from the cheesecake filling from soaking into the crust.
Step 6: Cool Completely
Remove the crust from the oven and place the pan on a cooling rack. Allow it to cool completely before adding the cheesecake batter. A hot crust can affect the texture of the filling.
Step 7: Add the Cheesecake Filling
Once cooled, pour your prepared cheesecake filling into the crust. Smooth the top evenly with a spatula before baking according to your cheesecake recipe.
Secrets to Prevent a Soggy Cheesecake Crust
- Always pre-bake the crust before adding the filling.
- Press the crumbs firmly to create a dense foundation.
- Use the correct butter ratio; too little causes crumbling, while too much can make the crust greasy.
- Allow the crust to cool completely before filling.
- For extra protection, brush the cooled crust with a thin layer of melted white chocolate and let it set before adding the cheesecake batter.
The Classic Touch: Honey Maid Graham Cracker Crust Recipe Explained
When Americans think of classic graham crackers, they think of Honey Maid. There is a reason this brand has remained the gold standard for decades: the distinct, warm back-note of real honey paired with a subtle molasses undertone.
Using Nabisco Honey Maid crackers gives your crust a nostalgic, deeply comforting flavor profile that pairs beautifully with both tart fruit fillings and rich chocolate. Because these crackers already carry a beautiful honey sweetness, you can often scale back on the added white sugar in your recipe, letting the natural flavors of the cracker and high-quality butter shine through.
Beat the Heat: Easy Graham Cracker Crust Recipe No-Bake Method
When summer rolls around, the last thing you want to do is turn on your oven. Luckily, a graham cracker crust recipe no-bake style is incredibly easy to pull off. Instead of using heat to melt the sugar and bind the crust, you rely entirely on the cooling power of your refrigerator.
When melted butter is mixed with cracker crumbs and then chilled, the butter solidifies, locking the crumbs into a firm, sliceable structure. This method is absolutely perfect for no-bake cheesecakes, icebox pies, or layered pudding desserts. Just ensure you chill the pressed crust for at least 30 minutes before pouring in your cool fillings.
The Ultimate Duo: Honey Maid Graham Cracker Crust Recipe for Cheesecake Lovers
When you combine the distinct taste of Honey Maid crackers with a rich, tangy cream cheese filling, magic happens. This specific Honey Maid graham cracker crust recipe for cheesecake introduces a warm, golden contrast to the sharp, velvety texture of a baked cheesecake.
To take this duo to the next level, try adding a tiny pinch of ground cinnamon or freshly grated nutmeg to the dry cracker crumbs. It subtly enhances the honey notes without overpowering the star of the show—your beautiful cheesecake filling.
Master the Base: Ingredients and Step-by-Step Instructions
Before we dive into specialized variations, let’s look at the master recipe. This ratio is designed perfectly for a standard 9-inch springform pan or a 9-inch deep-dish pie plate.
Ingredients You Will Need:
- Graham Cracker Crumbs: 1 ½ cups (about 11 to 12 full-sheet graham crackers)
- Granulated Sugar: ¼ cup (or 3 tablespoons of packed light brown sugar for a deeper caramel note)
- Unsalted Butter: 6 tablespoons ( melted and cooled slightly)
- Salt: A tiny pinch (optional, but highly recommended if using unsalted butter to balance the sweetness)
Step-by-Step Instructions:
- Pulse into Fine Crumbs: Place your graham crackers into a food processor and pulse until they form fine, uniform crumbs resembling damp sand. If you don’t have a food processor, place the crackers in a large zip-top bag and crush them thoroughly with a rolling pin.
- Combine the Dry Ingredients: In a medium-sized mixing bowl, whisk together the cracker crumbs, sugar, and a pinch of salt until completely combined.
- Incorporate the Butter: Pour the melted butter directly over the crumb mixture. Using a fork, toss the ingredients together until every single crumb is moistened. The mixture should hold its shape when you squeeze a handful of it together in your palm.
- Press Firmly into the Pan: Dump the damp crumbs into your pan. Use the flat bottom of a measuring cup or a straight-sided drinking glass to press the crumbs firmly into the bottom and up the sides of the pan. Start from the center and work your way outward to ensure an even thickness.
- Set the Crust:
- For Baked Desserts: Preheat your oven to 350°F (175°C) and bake the crust for 8 to 10 minutes until it looks lightly golden and smells fragrant. Let it cool completely before adding your filling.
- For No-Bake Desserts: Place the pressed crust directly into the refrigerator for 30 minutes or the freezer for 15 minutes to firm up before filling.
Scaling Up: Perfect Graham Cracker Crust Recipe for 9×13 Pan Desserts
If you are feeding a crowd or making popular potluck treats like lemon bars, dream bars, or a large batch of pumpkin cheesecake bars, you will need to scale your recipe. A standard 9-inch pie crust simply won’t cover the surface area of a large rectangular baking dish.
To adapt your graham cracker crust recipe for 9×13 pan dimensions, you need to increase your ingredients by roughly 50%. Use 2 ¼ cups of crumbs, 6 tablespoons of sugar, and 9 tablespoons of melted butter. This guarantees a thick, sturdy base that can easily support heavy, square-cut bar desserts.
Foolproof Tips for the Best Graham Cracker Crust Recipe for Cheesecake
Achieving bakery-quality results requires paying attention to the small details. Here are three foolproof tips to ensure your cheesecake base turns out flawless every single time:
- Watch the Crumb Size: Large, uneven chunks of cracker will create structural weak points, causing your crust to crack and crumble. Aim for a fine, powdery texture.
- Don’t Over-Bake: Keep a close eye on your oven during the blind bake. Because graham crackers are already baked once, the crumbs can burn quickly, turning bitter. Stop baking the moment you smell a warm, sweet aroma.
- Compact it Right: Don’t be afraid to use some muscle when pressing the crumbs into the pan. A loose crust is a crumbly crust. Pressing tightly ensures clean, elegant slices later.
The Comfort Food Take: Best Graham Cracker Crust Recipe Pioneer Woman Style
For those who love hearty, comforting, down-home country cooking, a best graham cracker crust recipe Pioneer Woman style brings an extra layer of rustic indulgence. This style embraces rich, buttery textures and often incorporates a handful of finely chopped pecans or walnuts directly into the crumb mix.
Furthermore, substituting white sugar entirely with dark brown sugar adds a deep, molasses richness that complements autumn pies like sweet potato, pumpkin, or pecan silk extraordinarily well.
Pro-Chefs’ Guide: Customizing Your Homemade Graham Cracker Crust Recipe
Once you have mastered the basic formula, you can treat this recipe as a blank canvas for your culinary creativity. Here are a few ways professional pastry chefs elevate their crusts:
- The Spice Rack: Stir in a half teaspoon of cinnamon, ginger, cardamom, or even a touch of espresso powder to match the flavor profile of your filling.
- Swap the Crackers: You can apply this exact same butter-to-crumb ratio to ginger snaps, vanilla wafers, Oreo cookies, or pretzels for a salty-sweet twist.
- Add Citrus Zest: Rubbing fresh lemon, lime, or orange zest into the sugar before mixing it with the crumbs infuses the entire crust with bright, aromatic oils.
Troubleshooting Your Graham Cracker Crust Recipe: How to Fix Crumbly or Hard Crusts
Even the simplest recipes can sometimes go awry. If you run into issues, here is how to diagnose and fix them:
- Problem: My crust is completely falling apart when I cut it.
- Fix: This usually happens because the crumbs weren’t pressed firmly enough into the pan, or there wasn’t quite enough butter to bind them. Next time, add an extra half-tablespoon of melted butter and ensure you use a flat-bottomed tool to pack the mixture down tight.
- Problem: My crust is so hard I need a saw to cut through it.
- Fix: You likely over-baked the crust or used too much sugar, which melted and turned into hard candy as it cooled. Reduce your baking time by 2 minutes, and ensure you are measuring your sugar accurately.
- Problem: The butter is leaking out of my springform pan in the oven.
- Fix: This is common with springform pans since they aren’t completely airtight. Simply wrap the bottom of your pan in aluminum foil before baking to catch any stray drips and keep your oven clean.
FAQs About Making a Homemade Graham Cracker Crust
Can I make this crust gluten-free?
Yes, absolutely! You can buy store-bought gluten-free graham crackers and substitute them at a strict 1:1 ratio by weight or volume. Because gluten-free crackers can sometimes be slightly drier, you may need to add an extra half-tablespoon of melted butter if the mixture feels too powdery.
Can I freeze a graham cracker crust for later use?
Yes, this recipe freezes beautifully. You can press the crust into your pie plate or springform pan, wrap it tightly in a double layer of plastic wrap and aluminum foil, and freeze it for up to 3 months. You can fill and bake it directly from frozen—no need to thaw!
Why does my crust get soggy under fruit pies?
Fruit fillings release a lot of liquid as they sit. To prevent a soggy bottom, bake your crust first, let it cool, and then brush a thin layer of melted white chocolate or a beaten egg white over the bottom before adding your filling. This creates a brilliant waterproof barrier.
Is it better to use salted or unsalted butter?
Unsalted butter is preferred because it allows you to completely control the salt content of your dessert. However, if you only have salted butter on hand, go ahead and use it—just skip the extra pinch of salt called for in the recipe.
Conclusion
Mastering a classic homemade graham cracker crust recipe is a simple, high-reward skill that instantly elevates your home baking game. With just three everyday ingredients and less than ten minutes of effort, you create a rich, buttery, golden base that easily outperforms any pre-made alternative. By tailoring your method—whether you choose a quick, refreshing no-bake chill or a crisp, aromatic blind bake—you ensure that your pies and cheesecakes sit on a perfect foundation every time. Gather your ingredients, pack those crumbs tightly, and get ready to enjoy the most satisfying, clean-cutting dessert base you have ever tasted!
