

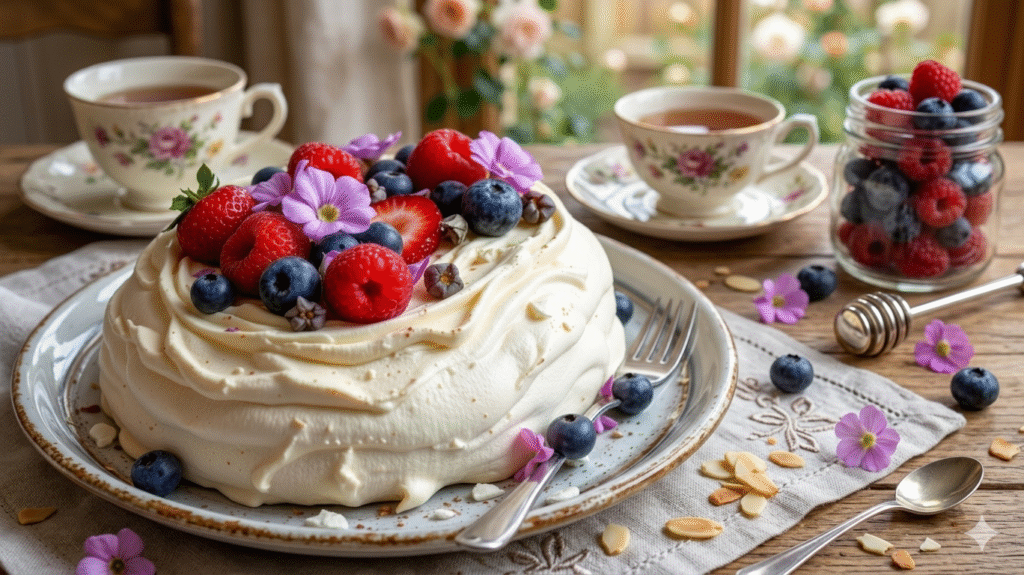
There is something truly magical about a well-crafted meringue dessert resting beautifully on a cake stand. It catches the eye instantly, usually piled high with billowy whipped cream and a colorful array of fresh fruit.
If you have ever tried a slice of this magnificent treat, you already know the irresistible textural contrast it delivers. The delicate, shattered crunch of the outer shell gives way to a soft, melt-in-your-mouth marshmallow center. It feels light, yet entirely decadent.
Creating this masterpiece at home might seem intimidating for beginners, but it all comes down to understanding a few fundamental baking rules. By mastering the right techniques, anyone can whip up a stunning centerpiece for their next dinner party or family gathering. Let us look at everything you need to know to bake, top, and serve a flawless meringue masterpiece.
Authentic Homemade Pavlova Recipe
Ingredients
Method
- Step 1: Prep the Oven and Tray
- Preheat your oven to 300°F (150°C). Line a large flat baking sheet with parchment paper. Use a pencil to trace an 8-inch circle on the paper, then flip the paper over so the pencil mark does not transfer to your food.
- Step 2: Whip the Egg Whites
- Ensure your mixing bowl and whisk attachment are completely clean and grease-free. Whip the room-temperature egg whites on medium speed until soft peaks form.
- Step 3: Add the Sugar
- Increase the mixer speed to medium-high. Add the caster sugar one tablespoon at a time, waiting a few seconds between each addition. Continue whipping until the mixture is thick, glossy, and holds stiff peaks. (Test by rubbing a little mixture between your fingers; it should feel completely smooth, not gritty).
- Step 4: Fold in the Stabilizers
- Remove the bowl from the mixer. Sprinkle the cornstarch, white vinegar, and vanilla extract over the glossy meringue. Use a silicone spatula to gently fold the ingredients together. Do not overmix, or you will deflate the egg whites.
- Step 5: Shape and Bake
- Spoon the mixture onto your parchment paper, using your traced circle as a guide. Smooth the edges and create a slight dip in the center to hold your toppings later. Place the tray in the oven and immediately reduce the heat to 225°F (110°C). Bake for 90 minutes.
- Step 6: Cool Completely
- Turn the oven off, but do not open the door. Leave the baked meringue inside the oven to cool completely for at least a few hours, or ideally overnight. This prevents sudden temperature changes that cause cracking.
Why the Perfect Pavlova Cake Captivates Dessert Lovers Worldwide
Dessert enthusiasts are drawn to this treat for its elegant simplicity and brilliant play on textures. Unlike dense chocolate cakes or heavy pastries, this dessert feels refreshingly light. The high sugar content provides a satisfying sweetness, perfectly balanced by the tartness of fresh berries or passionfruit piled on top.
Its visual appeal also plays a huge role in its global popularity. A finished pavlova looks like a rustic, edible crown. Because the meringue bakes into organic, slightly imperfect shapes, it holds a charming, homemade aesthetic that still manages to look incredibly sophisticated on a dining table.
The Royal History: Who Was Anna Pavlova and How Did She Inspire This Dessert?
The origins of this famous dessert stem from the early 20th century, inspired by the legendary Russian ballerina Anna Pavlova. During her tours to Australia and New Zealand in the 1920s, a chef wanted to create a dessert that mirrored the lightness and grace of her tutu.
To this day, Australia and New Zealand fiercely debate who exactly invented it first. Both nations claim the iconic dessert as a national treasure. Regardless of its true birthplace, the sweet creation captured the hearts of bakers across the globe and cemented Anna Pavlova’s name in culinary history forever.
Foolproof Pavlova Ingredients: What You Need for a Flawless Bake
You do not need a pantry full of complex items to make a great pavlova. The magic happens through the careful combination of a few basic staples. Here is exactly what you need for the meringue base:
- 4 large egg whites: These must be at room temperature to achieve maximum volume when whipped.
- 1 cup caster sugar (superfine sugar): Caster sugar dissolves much easier into the egg whites than regular granulated sugar, preventing a gritty texture.
- 1 teaspoon white vinegar: The acid helps stabilize the whipped egg whites, ensuring they hold their shape.
- 1 teaspoon cornstarch (cornflour): This secret ingredient creates the famous marshmallow-like center.
- 1 teaspoon pure vanilla extract: For a subtle, sweet aroma.
Step-by-Step Pavlova Recipe: Achieving a Crisp Shell and Marshmallow Center
Follow these instructions closely to build your dessert base.
Step 1: Prep the Oven and Tray
Preheat your oven to 300°F (150°C). Line a large flat baking sheet with parchment paper. Use a pencil to trace an 8-inch circle on the paper, then flip the paper over so the pencil mark does not transfer to your food.
Step 2: Whip the Egg Whites
Ensure your mixing bowl and whisk attachment are completely clean and grease-free. Whip the room-temperature egg whites on medium speed until soft peaks form.
Step 3: Add the Sugar
Increase the mixer speed to medium-high. Add the caster sugar one tablespoon at a time, waiting a few seconds between each addition. Continue whipping until the mixture is thick, glossy, and holds stiff peaks. You should be able to rub a little mixture between your fingers without feeling any sugar granules.
Step 4: Fold in the Stabilizers
Remove the bowl from the mixer. Sprinkle the cornstarch, white vinegar, and vanilla extract over the glossy meringue. Use a silicone spatula to gently fold the ingredients together. Do not overmix, or you will deflate the egg whites.
Step 5: Shape and Bake
Spoon the mixture onto your parchment paper, using your traced circle as a guide. Smooth the edges and create a slight dip in the center to hold your toppings later. Place the tray in the oven and immediately reduce the heat to 225°F (110°C). Bake for 90 minutes.
Step 6: Cool Completely
Turn the oven off, but do not open the door. Leave the baked meringue inside the oven to cool completely for at least a few hours, or ideally overnight. This prevents sudden temperature changes that cause cracking.
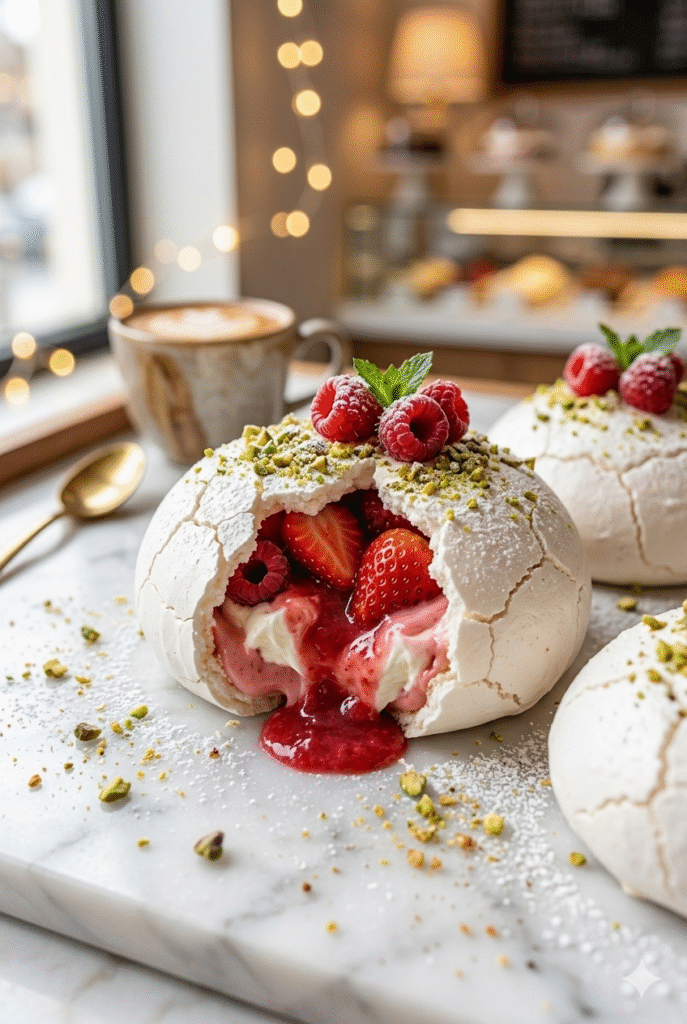
What is a Pavlova Inside? Understanding the Magical Texture
Many people confuse this dessert with a standard hard meringue, but they are entirely different experiences. While a standard meringue cookie is crisp and dry all the way through, a pavlova contains a hidden surprise.
Thanks to the addition of cornstarch and vinegar, the interior remains soft and chewy. When you cut into the baked shell, the inside looks and tastes like fresh, fluffy marshmallow. This soft center contrasting with the brittle, sugary crust is the defining hallmark of the dessert.
Creative Pavlova Toppings: From Classic Berries to Exotic Flavors
The toppings are where you can truly let your culinary creativity shine. The traditional topping requires a thick layer of unsweetened or lightly sweetened whipped cream, followed by fresh fruits.
- The Classic: Sliced strawberries, blueberries, and fresh kiwi. The acidity of the kiwi cuts through the sweetness beautifully.
- Tropical Escape: Mango chunks, fresh pineapple, toasted coconut flakes, and a generous drizzle of passionfruit pulp.
- Decadent Chocolate: Substitute some of the fruit for chocolate shavings, crushed hazelnuts, and a drizzle of rich chocolate ganache over the whipped cream.
Common Mistakes to Avoid When Baking a Pavlova at Home
Baking meringue can be tricky if the environmental conditions are working against you.
First, avoid making this dessert on highly humid or rainy days. Sugar absorbs moisture from the air, which can cause your beautiful crisp shell to turn soft, sticky, and weeping with sugary syrup.
Second, never rush the cooling process. Pulling the hot tray out into a cool kitchen will immediately shock the structure, causing massive cracks to form across the surface. Leaving it inside the turned-off oven is essential.
Finally, ensure absolutely no egg yolk gets into your whites during separation. Even a microscopic drop of fat will prevent the egg whites from whipping into stiff peaks.
Craving a Slice? How to Find the Best Pavlova Near Me
If you do not have the time to bake, you can still satisfy your craving. Start by checking out authentic Australian or New Zealand-style cafes in your city, as they frequently feature this dessert on their menus. Upscale bakeries that specialize in French pastries or custom cakes often offer mini versions topped with seasonal fruits. A quick search for “meringue desserts” or checking the dessert menus of local fine-dining restaurants will usually point you in the right direction.
Where to Look for a Premium Pavlova to Buy for Special Occasions
When hosting a dinner party or celebrating a birthday, buying a professionally made dessert takes the pressure off your shoulders. Look for bespoke cake shops and patisseries that require advanced ordering.
Many gourmet food markets and high-end grocery store bakeries sell the baked meringue shells on their own. This allows you to purchase the tricky part and simply add your own whipped cream and fresh berries at home, giving you a semi-homemade dessert that still impresses guests.
How to Store and Serve Your Pavlova Like a Professional Chef
Timing is everything when it comes to serving. The baked shell can be made up to two days in advance. Store it in a completely dry, airtight container at room temperature. Never put an undecorated shell in the refrigerator, as the moisture will ruin the crisp exterior.
Wait to assemble the dessert until just before you are ready to eat. Once you add the wet whipped cream and juicy fruits, the meringue will begin to soften and eventually collapse. Bring it to the table whole for a stunning visual presentation, then use a sharp, serrated knife to cut gentle slices for your guests.
Bring Your Dessert Dreams to Life
Mastering this dessert opens up a whole new world of elegant entertaining. With its fascinating history, accessible ingredients, and show-stopping appearance, it is a recipe every home baker should have in their repertoire. Gather your ingredients, make sure your mixing bowl is spotless, and start whipping up your very own meringue masterpiece today.
FAQs
1. Why is my meringue not stiffening properly?
This can happen if there is fat or moisture in the mixing bowl or on the whisk. Ensure all your tools are completely clean and dry before starting. Additionally, make sure you’re using fresh eggs and separating the whites carefully to avoid any traces of yolk.
2. How do I store meringue desserts?
Store meringue in an airtight container at room temperature to maintain its crisp texture. Avoid refrigerating meringue, as the moisture can make it soft and sticky.
3. Can I make meringue ahead of time?
Yes, meringues can be made in advance and stored correctly for a few days. However, it’s best to assemble desserts like pavlovas close to serving time to prevent the meringue from absorbing too much moisture.
4. What should I do if my meringue cracks during baking?
Cracks are a common issue but often add charm to homemade meringue. To minimize cracking, bake the meringue at a low and consistent temperature and allow it to cool slowly in the oven with the door slightly ajar.
5. Can I flavor my meringue?
Absolutely! You can add extracts like vanilla, almond, or citrus zest for subtle notes. For a colorful twist, incorporate a touch of food coloring during the beating process.

